Vision disorders are prevalent in infants and preschoolers. A report of children between the ages of 6 months and 6 years showed that 33% had hyperopia, 22.5% had astigmatism and 9.5% had myopia.1 Also in this age group, 5% had binocular vision disorders, 21.1% had strabismus, 7.9% had amblyopia, 1% had accommodative disorders and 0.5% had retinal problems.1
In addition, children who have poor visual efficiency or lack of refractive correction can have serious learning problems.2 In fact, children who are described as struggling in school are often in need of significant hyperopic, astigmatic or myopic corrections. Corrections to these conditions, in turn, have been shown to make significant differences in classroom performance.2 Studies have also shown that the earlier the visual problem is diagnosed, the better the overall prognosis, as the intervention occurs sooner rather than later.1
For the above reasons, Kentucky passed House Bill (HB) 706, which requires each child in the state to receive a comprehensive eye examination by an optometrist or ophthalmologist before starting public preschool, public school or the Head Start Program.3 Since HB 706 passed in July 2000, several other states have followed Kentuckys lead by introducing similar laws. This means that the number of infants and toddlers entering U.S. optometric practices could increase considerably. Also, the American Public Health Association recommends that first eye examination be given at 6 months, then at 2 years and then at 4 years.4
As optometrists, we cannot only reach out to this severely underserved population, but also be prepared for the possible influx of pediatric patients in the coming years.
In this first installment of Review of Optometrys three-part series, Pediatric Practice, Ill discuss the various components of an infant and toddler eye examination.
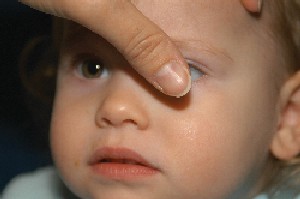 |
| The practitioners thumb is a much less intrusive occluder for the young child, and it covers each eye extremely well. |
1. Initial Encounter
While you want to establish a rapport with the childs parent, establishing one with the child is equally important. A child is acute- ly aware of the presence of someone new, and he is used to getting all of the attention. If you ignore the patient in favor of the parent only, the child will likely become afraid and uncooperative.
To begin with, I do not wear a white doctors coat, as many children have had prior uncomfortable, frightening experiences with others who have worn this piece of clothing. I try to establish a connection with my young patients by introducing myself to him or her while making direct eye contact and smiling. (You may want to introduce yourself using your first name and not Dr., as some children are afraid of doctors.)
When you make eye contact and say a few kind words, you not only put the infant or toddler at ease, but you assure the parents that you are comfortable examining their child. One way I make my toddler patients happy and comfortable: I comment on and ask questions about any characters these children often have on their clothing.
Another suggestion: If your patient is a toddler, tell him what he can expect before you conduct any portion of the exam. This helps allay any fears he may have. Keep your explanation brief, as a childs imagination can run wild and cause him to panic. For example, before you seat the child behind the slit lamp, assure him that all he must do is look through the holes and try to see the doctors eyes. Theres no point in going into detail about what you are looking for; the patient will not understand, and he may become frightened. How you interact with the child not only sets the tone of the entire examination; it may actually determine the examinations outcome.
2. Case History
Questions regarding the patients ocular history, medical history, family history, allergies and use of medications are a standard part of any case history. When the patient is an infant or toddler, however, you also must ask questions about the prenatal, perinatal and postnatal periods, and about the childs developmental history.
One important question to ask the parents: Was your child born at full-term? The answer to this ques- tion is important because premature infants are more likely to be placed on oxygen shortly after birth, which increases their risk for retinopathy of prematurity.5
Because the parent can become so preoccupied with the child during the examination, he or she may not answer your questions accurately. So, you may want to mail or fax a standard questionnaire before the childs appointment to ensure the questions are answered thoroughly and correctly.6
|
How to Prepare for the |
| Here are two additional ways you can prepare for the infant/toddler exam: Make sure your office is child friendly. This means you should have plenty of toys, coloring books and perhaps even a television playing the latest G-rated movie. Have your receptionist schedule appointments when the child will likely be in the best mood. This is often first thing in the morning or right after a nap. This way, you and the parent can avoid fussiness during the infant or childs examination. However, the childs nap or feeding time may come up in the middle of the exam, so be prepared to break. Also, have the parent bring a snack along. C.A. |
While visual acuity techniques are quite limited for an infant, we have more choices than we did in the past. You can check acuity using:
A transilluminator or toy. Place one of these engaging targets in your hand, then slowly move the object to see if the baby can fixate and follow with each eye. You can first do this binocularly, then use your hand to cover each patients eye, and assess the fixation monocularly. While this technique cannot give you a numeric visual acuity value, it can help to determine any large visual differences between the eyes.
An optokinetic drum. You can use this device to determine wheth- er there is a cortical visual response. Specifically, you can slowly turn the instrument horizontally and vertically in front of the infant to assess that some vision is getting into the cortex.6,7
To use the optokinetic drum, hold the device with the stripes going vertically in front of the infant. Slowly spin the drum, and look for the infants eyes to show a nystagmus movement. This test only takes a few seconds, and the devices stripes are enough to keep the child focused.
Teller acuity cards. This forced choice preferential acuity test is an accurate way to a more numeric value for the visual acuity of the infant.8,9
Start this test by holding a higher acuity card in front of the infant at 55cm. This card will have black and white stripes on one side and a blank space on the other. (Ideally, you want to perform this test in a room that has nothing in it, so all the infant has to look at are the stripes on the card.)
Look through a small hole in the card to see if the infant looks at the black and white stripes as opposed to the blank space. To determine the threshold acuity value, move through the cards from higher to lower acuity values until the child no longer attends to the task.
Electrodiagnostic testing, such as visual evoked potentials. This is a very accurate way to achieve numerical values for the visual acuity in infants. However, very few optometrists incorporate these devi- ces into their practices, as such testing requires a more elaborate set-up and more advanced training.10,11
LEA acuity cards. The above techniques, particularly the Teller acuity cards, are all possible options for toddlers ages 1 to 3.8,9 But, as the child approaches age 2, she often can do the simple symbol matching techniques of the LEA acuity cards.8,9,12
These cards come in two formats. If the child has enough verbal skills to tell you the differences between shapes, do the following: Place the card with the shapes 10 feet away from the patient. Ask her to tell you what she sees, depending on what you point to. Or, you could have the patient name each object from left to right. (The cards shapes will keep the childs attention.)
If the toddler does not yet have sufficient verbal skills, give her a smaller card that has the same shapes. Then point to an object on the larger card that is located 10 feet away, and ask the patient to point to the same object.
This technique can be time consuming, but it often gives accurate results, and it is the first test that can provide near visual acuity information as well when a near version of the symbol card is used.
Broken Wheel test. Another forced choice test that works well for toddlers is the Broken Wheel test. Most toddlers are familiar with the concept of the wheels on a car, and can often be cajoled into pointing to the broken one.13
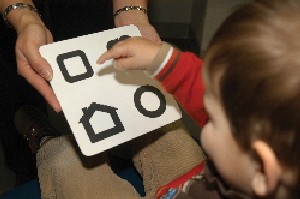 |
| The LEA acuity card, which contains various shapes, is one way you can assess the young patients visual acuity. This patient has been asked to point to the square. |
You assess extraocular motility throughout the examination by direct observation of the childs eyes and by watching his eyes follow moving objects, such as your transilluminator or a small toy. To test extraocular motility, take a toy that is interesting to the child, and move it in front of him. Watch how the patients eyes move, both binocularly and monocularly.
You can easily perform pupil testing by using a bright light and watching the pupil reaction, just as you would for a patient of any age.
Although color vision testing cannot be done on an infant, a two- to three-year-old child may be able to respond to a simple color vision test, such as the Color Vision Made Easy test. The test plates contain a circle on each plate, as well as a star and/or square.14 To perform this test, place the card 16 inches away from the patient. Both his eyes should be open. Then ask him to point to the circle on each card.
5. Binocular Posture
Children often present to the optometrist because strabismus is suspected. So, you want to evaluate binocular posture as thoroughly as possible. Several possible methods for doing this include:
Cover testing. This is the gold standard, and it can be informative. But, use of the appropriate targets is crucial.
To keep the patients attention while performing the cover test, use a small toy or sticker that can engage the child for more than a few seconds. Talk to the patient about the target, and ask him questions about it to keep his attention. Another suggestion: Use your thumb (held close to the childs eye) instead of an occluder to cover each eye. I have found that my thumb is much less distracting to children than a large piece of plastic coming into their view.
Hirschberg/Kappa test. This test should be the next course of action if you are unsuccessful with the cover test.
Perform this test while the child is seated, either by himself or on the parents lap. Hold your transilluminator 33 to 50cm away from the patient, and shine the light at the bridge of his nose. Ask the patient to look at the light. (To keep him focused on the light, put your fingertip at the end of the transilluminator and flash the light randomly.
Note the position of the corneal reflexes in relation to the center of the pupil. Estimate in millimeters the position of the reflex from the center of the pupil for each eye.
Repeat the test with the patient monocular (Kappa), and hold the transilluminator in line with the center of each eye. Compare the results of the binocular (Hirschberg) and Kappa tests to determine the fixating eye.
If the reflex is in the same position under monocular and binocular conditions, then that eye is fixating. A relatively temporal reflex in one eye suggests esotropia. A relatively nasal reflex suggests exotropia. A relatively higher reflex suggests hypotropia of that eye. Finally, a relatively lower reflex suggests hypertropia of that eye. Keep in mind that 1mm of displacement equals 22 prism diopters.
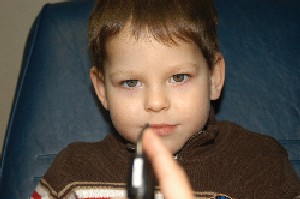 |
| The young patient looks at the transilluminator during the Hirschberg/Kappa test. |
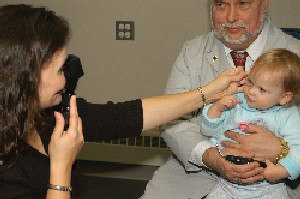
Bruckner test. This test can objectively assess whether theres possible strabismus by using the ophthalmoscope held at 100cm and comparing the red reflexes. To do this test, dim the room lights, and keep the patient directly in front of you. Hold your ophthalmoscope approximately 1 meter from the patient. Look through the ophthalmoscope so that you can get a clear view of both eyes at the same time. (Having you directly in front of the patient is enough to keep his or her focus.) Compare the fundus reflexes. An eye with a whiter, brighter reflex may be the strabismic eye.
Nearpoint of convergence test. This test, performed with an interesting target, can address the childs gross convergence ability. A child as young as 6 months should be able to perform this test.15 To do this test, have the infant/child look at a detailed target, such as a sticker or toy. (The target must be enticing enough to keep the childs eyes on it.) Move the target toward the patient until you see an eye turn out or the eyes converge all the way to the patients nose.
6. Refraction
To evaluate the refractive status of an infant or toddler, perform a retinoscopy, whether undilated or with cycloplegia. There is no specific advantage to doing either one. The use of auto-refractors is not encouraged with this population, as the results are not proven to be accurate.
You can perform traditional distance retinoscopy on an infant or toddler with the help of a DVD or video. For example, I had one patient watch a Sesame Street video. To keep the child still and engaged, I asked him questions about the video depending on what I heard. So, if I heard a new voice, Id ask, Whos that?
 |
| Dr. Allison performs a retinoscopy on this young patient using a loose lens. infants and toddlers are often too small to fit behind the phoropter. |
If you plan to perform a dilated retinoscopy, whether with tropicamide or cyclopentolate, realize that no child likes to receive eye drops. So, you may want to follow these tips:
Use a spray rather than an eye dropper. Children do not like being forced to lie down while the practitioner pries their eyes open.
Do not mention the possibility of pain or stinging. This will only frighten the child into refusing to accept the drop.
Put a drop or the spray into a dolls or stuffed animals eye before you administer the drops to the patient.
Show the patient a sticker or a small toy that he will receive after you administer the drop or spray.
Since the child is usually too small to fit behind your phoropter, use lens racks or loose lenses. Consider per- forming a retinoscopy before and after the dilation whenever possible to improve the accuracy of the results and to ascertain the full amount of hyperopia or astigmatism that may be present. Another method of retinoscopy for the infant or toddler is Mohindra retinoscopy. (See How To Perform Mohindra Retinoscopy.)
|
How To Perform Mohindra Retinoscopy |
| Seat the child comfortably in the center of the room, either by himself or on the parents lap, and occlude one eye. Turn off all the rooms lights to ensure total darkness. Encourage the child to focus on your retinoscope light. (The complete darkness of the room will facilitate this, and the small light will get the patients mind off of the dark.) Perform the retinoscopy at a distance of 50cm from the patient. As with cycloplegia retinoscopy, use loose lenses or sciascopy bars, but do not use the phoropter. Calculate your gross findings. Add 1.25D to your gross findings to determine the final value. This method can lead to very accurate results as long as you remember to convert his or her findings with a value of 1.25 instead of the usual working distance.16,17 Repeat all of the above on the childs other eye. |
7. Anterior Segment Exam and Dilated Fundus Evaluation
The anterior segment evaluation of an infant or toddler can be performed using a number of simple devi- ces. It is no different than the anterior segment evaluation of any patient. The use of a hand-held slit lamp, a Burton lamp or a 20D lens with a light source can give appropriate magnification to observe the details of the anterior segment. If staining of the corneal surface is necessary, you can quickly instill sodium fluorescein and easily view the anterior segment with the cobalt filter on either the hand-held slit lamp or the Burton lamp.
To adequately evaluate the fundus, the child will need to be dilated using either drops or spray.18 For infants younger than age 1, the standard for dilation is one drop of 0.5% tropicamide and one drop of 2.5% phenylephrine. For cycloplegia of the infant, 0.5% cyclopentolate with 2.5% phenylephrine can be used. For toddlers past the age of 1, 1.0% tropicamide or 1.0% cyclopentolate along with 2.5% phenylephrine can be used.19 Some additional pearls on how to administer a drop or spray to the young patient:
Tell the child that the drop or spray will make his eyes glow like a
superheros eyes do (particularly after the use of fluorescein).
Distract him with an entertaining DVD or video.
Talk to the patient about his favorite character in the DVD or video.
The best way to measure intraocular pressure in an infant or toddler is with a hand-held applanation tonometer. You can attempt non-contact tonometry as well; however, the results are often better with a hand-held applanation instrument, as you often cannot fit an infant or toddler into the non-contact tonometer.6
 |
| Dr. Allison performs a retinoscopy using a loose 20D lens, while the young patients head is tipped back into Dr. Allisons lap. This position gives the parent more control of the child, while the child is still comfortable. |
Once youve administered the dilation agents, encourage the child to relax. If the childs naptime is near, allow him to sleep. In fact, you may want to know ahead of time when the patients nap and feeding times are, because a dilated fundus evaluation on a sleeping child, or even a child who is contently sucking a bottle or eating a favorite snack, is quite easy.
The primary goal of the dilated fundus evaluation is to view the posterior pole of both eyes. Views of the peripheral retina should be attempted, but will not always be seen. When performing the dilated evaluation, the infant may be held over a parents shoulder. That way, the parent can hold the childs head still while you prop open the patients eyes. Or the child may sit or lie in the parents lap.
Another effective position: Have the toddler straddle their seated parents waist while the parent tips the childs head back into your lap. This can give you and the parent great control of the child, while the child is still comfortable.
All of the above tests must be done as objectively as possible. While a toddler may be eager to answer your questions about his vision, those answers may not be correct.
There is no doubt that infants and toddlers can be challenging patients. But, by being creative, accommodating and kind, you will not only get the examination results you need, but a happy and trusting child and parent who will not only seek your services in the future, but refer friends and family.
Dr. Allison is an associate professor at the Illinois College of Optometry and is program coordinator for the colleges Binocular Vision and Pediatric Optometry Residency. She is also a diplomate in binocular vision, perception and pediatric optometry of the American Academy of Optometry and a fellow of the College of Optometrists in Vision Development.
Next month: In Pediatric Practice, Part 2, Dr. Allison will discuss how to assess convergence, eye movement and accommodative problems in the school-age child.
1. Scheiman M, Gallaway M, Coulter R, et al. Prevalence of vision and ocular disease conditions in a clinical pediatric population. J Am Optom Assoc 1996 Apr;67(4):193-202.
2. Solan HA, Press LJ. Optometry and learning disabilities. J Optom Vision Dev March 1989; 20:5-21.
3. KY Department of Education: School Eye Exam: Questions and Answers. edueducation.ky.gov/KDE/Instructional+Resources/Early+Childhood+Development/School+Eye+Exam:+Questions+and+Answers.htm 15 January 2005.
4. American Public Health Association. Improving early childhood eyecare. Policy Statement No. 20011. Washington, DC: APHA, 2001.
5. Marsh CS, Marden B, Newsom R. Severe retinopathy of prematurity (ROP) in a premature baby treated with sildenafil acetate (Viagra) for pulmonary hypertension. Br J Ophthalmol 2004 Feb;88(2):306-7.
6. Rouse MW, Ryan JM. The optometric examination and management of children. In: Rosenbloom AA, Morgan MW, eds. Principles and practice of pediatric optometry. Philadelphia: JB Lippincott, 1990:155-91.
7. Ling W, Gay AJ: Optokinetic nystagmus: a proposed pathway and its clinical application. In Smith JL, ed. Neuro-ophthalmology, vol 4, St. Louis: CV Mosby, 1968.
8. Birch EE, Naegele J, Bauer JA, Held R. Visual acuity of toddlers. Invest Ophthalmol Vis Sci 1980; 20(suppl):210.
9. Spierer A, Royzman Z, Chetrit A, et al. Vision screening of preverbal children with Teller acuity cards. Ophthalmology 1999 Apr;106(4):849-54.
10. Riddell PM, Ladenheim B, Mast J, et al. Comparison of visual acuity in infants: Teller acuity cards and sweep visual evoked potentials. Optom Vis Sci 1997 Sep;74(9):702-7.
11. Prager TC, Zou YL, Jensen CL, et al. Evaluation of methods for assessing visual function of infants. J AAPOS Oct;3(5):275-82.
12. Hyvrinen L, Nsnen R, Laurinen P. New visual acuity test for pre-school children. Acta Ophthalmol (Copenh) 1980 Aug;58(4):507-11.
13. McDonald M, Chaudry NM. Comparison of four methods of assessing visual acuity in young children. Optom Vis Sci 1989 Jun;66(6):363-9.
14. Ciner EB. Examination procedures for infants and young children. In: Moore BD, ed. Eye care for infants and young children. Boston: Butterworth-Heinemann, 1997:85.
15. American Optometric Association. Optometric clinical practice guideline: pediatric eye and vision examination. 2nd ed. St. Louis: AOA, 2002.
16. Mohindra I. A technique for infant vision examination. Am J Optom Physiol Opt 1975 Dec;52(12):867-70.
17. Mohindra I, Molinari JF. Near retinoscopy and cycloplegic retinoscopy in early primary grade schoolchildren. Am J Optom Physiol Opt 1979 Jan;56(1):34-8.
18. Ismail EE, Rouse MW, De Land PN. A comparison of drop instillation and spray application of 1% cyclopentolate hydrochloride. Optom Vis Sci 1994 Apr;71(4):235-41.
19. Amos JF. Cycloplegic refraction. In: Bartlett JD, Jaanus SD, eds. Clinical Ocular Pharmacology. 4th ed. Boston: Butterworth-Heinemann, 2001:425-32.