It’s a typical afternoon in your practice and a 35-year-old male presents with the following complaint: “I was installing shelves in my home a few days ago and I think I got something in my eye.” He mentions that he could see something dark gray on his eye when he looked in the mirror. He tried to rinse it out, but it wouldn’t budge—now the eye is red and painful.
Ocular foreign bodies are a common form of ocular trauma, accounting for approximately 40% of all such traumas and leading to about 2% of all emergency room visits.1,2 Patients’ symptoms can vary widely depending on the nature and timing of the foreign body injury.
Regardless of your practice mode, most of us have encountered situations similar to this. But what is the best way to proceed? In this article, we will review how to evaluate, treat and manage patients with an ocular foreign body, as well as provide helpful clinical pearls for successful removal.
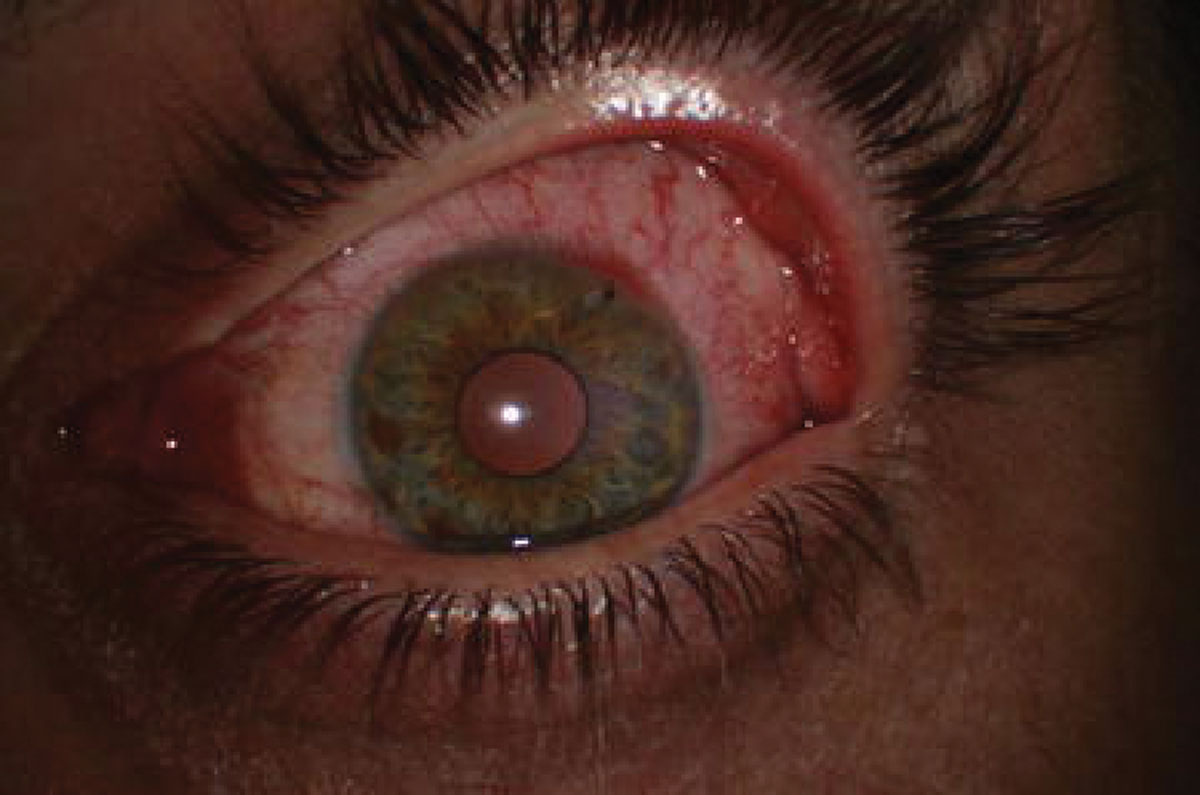 |
Fig. 1. Preoperative slit lamp biomicroscopy of a patient’s left eye shows the embedded corneal foreign body. Photo Credit: Ali Riza Cenk Celebi, MD, Ayse Ebru Kilayuzoglu, MD, Ugur Emrah Altiparmak, MD, C. Banu Cosar, MD and Abdullah Ozkiris, MD. Click image to enlarge. |
#1: Take a Thorough Patient History
A proper detailed history of the patient will help guide your examination, determine the type of prophylactic care needed as well as provide documentation for any workers’ compensation or other legal issues that may be associated with the incident. The case history should be problem-focused with an emphasis on what, when, where and how.
• Ask what the foreign body is. Knowing the kind of material involved can help give you an idea of the risk for infection and guide your decision-making on the type of postoperative treatment that may be indicated. Organic or vegetative materials are associated with a higher rate of infection. Metallic materials are likely to result in a rust ring. Inert materials (i.e., glass, ceramic or high-grade plastic) tend to be non-reactive and carry less risk of an inflammatory response.3,4
• Ask when the injury occurred. The longer the foreign body has been in place, the higher the risk for infection, inflammation and rust formation (with metallic ferrous material). Salt present in the tears can react with the iron in metallic foreign bodies to create a corneal rust ring around the foreign body. This reaction typically begins within a few hours of the injury occurence and can result in a complete rust ring within eight to 12 hours.5
• Ask where the patient was when the injury occurred. Were they at home or at work? Also ask if they were wearing safety eyewear. Proper documentation of this is important, as it could be pivotal information in workers’ compensation, insurance and liability cases.
• Ask how the injury happened. The mechanism of ocular injury helps determine the force with which the foreign body may have entered the cornea. High-risk mechanisms include grinding, hammering, metal shaving, machine yard work and exposure to explosives.2 These scenarios should raise your suspicion for possible penetrating injury and help you decide whether imaging scans are necessary.
It is also important to know the patient’s previous best-corrected visual acuity (BCVA) and any other relevant ocular history. Underlying pathology, previous corneal injuries and previous surgeries can impact prognosis. Other relevant information to gather during the case history includes documentation of events or interventions since the time of the injury, date of the patient’s last tetanus shot and, in the cases of suspected penetrating injury, when the patient last ate or drank should be noted to determine if intraocular surgery is indicated.
#2: Don't Cut Corners or Rush Exams
Attention to detail during foreign body removal can make the difference between successful outcomes and sight-threatening complications.
Immediately following the case history, be sure to obtain and document BCVAs before performing any procedures or instilling drops. This will determine the level of suspicion for penetrating injuries, as these injuries are associated with more significantly decreased vision. Baseline visual acuities are also important for medicolegal reasons.
For example, if the patient has amblyopia or another pre-existing condition causing reduced acuity, it is important to have documentation that the acuity was reduced prior to the procedure that you performed. This could protect you from allegations that your procedure is responsible for the patient’s reduced acuity. An exception to this rule is if the patient is experiencing intense pain with blepharospasm, rendering them unable to open their eyes. In this case, a drop of topical anesthetic such as proparacaine or tetracaine may be instilled prior to visual acuity measurement.
Other entrance tests such as pupil and extraocular motility testing should be performed, as abnormalities in pupil shape (e.g., a peaked iris) and limited mobility of the eye can be a sign of penetrating injury.
A thorough slit lamp exam should be performed, first without fluorescein dye. Examine all structures of both eyes looking for injection, chemosis, anterior chamber cells and flare and presence of foreign bodies. Be sure to check the conjunctiva for any signs of perforation—this will appear as an area of injection and chemosis surrounding an entrance point. Always perform lid eversion to check for foreign bodies trapped under the eyelid.
After your initial scan of the ocular structures, add fluorescein dye and examine the eye using a Cobalt blue filter. Look for signs of epithelial defects, corneal abrasions or lacerations. Keep in mind that the presence of vertically oriented linear abrasions could result from foreign bodies embedded under the eyelid.
Always perform the Seidel test to help rule out globe perforation. A positive test will appear as a “dark waterfall” of aqueous leakage within the fluorescein, indicating that ocular penetration has occurred. Other signs consistent with a penetrating injury include shallow anterior chamber, hyphema, defects of the iris or pupil, a break in Descemet’s membrane and lens opacities.5
As a word of caution, small foreign bodies characterized by high heat or high velocity can penetrate the globe and result in a self-sealing entry point. Such wounds may not result in a positive Seidel sign or shallow anterior chamber, but a tunnel through the cornea may be visible. In addition, there may be associated anterior uveitis. If there are any signs or suspicion of penetrating injury, apply a rigid shield (e.g., Fox shield or inverted Styrofoam cup) and refer the patient immediately to the emergency department or ophthalmic surgeon for specialty evaluation and management.
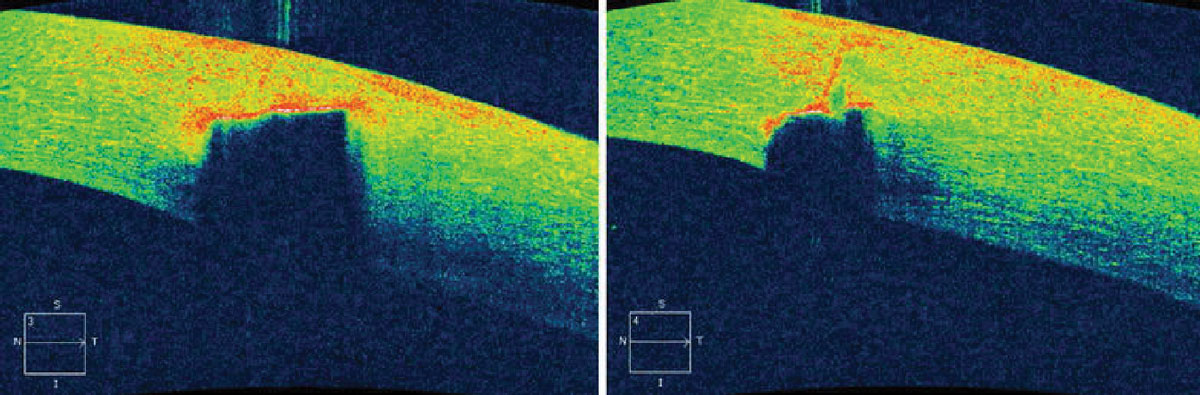 |
Fig. 2. Preoperative imaging of a patient’s left eye. AS-OCT shows hyper-reflectivity and shadowing due to the corneal foreign body (left). The corneal foreign body did not completely penetrate the cornea (right). Photo Credit: Ali Riza Cenk Celebi, MD, Ayse Ebru Kilayuzoglu, MD, Ugur Emrah Altiparmak, MD, C. Banu Cosar, MD and Abdullah Ozkiris, MD. Click image to enlarge. |
Once the eye is stabilized, further investigation for retained foreign bodies is indicated with tests such as dilated fundus examination, gonioscopy and imaging studies. Potential imaging methods include computed tomography scans, B-Scan ultrasonography, ultrasound biomicroscopy, plain film x-rays and magnetic resonance imaging. The latter is contraindicated if suspected foreign body is metallic because it can cause migration of the object, further damaging the ocular tissues.
After you’ve ruled out penetrating injury and located the foreign body, determine its exact location, size and depth. Keep in mind there can be more than one foreign body present, or one in the fellow eye that the patient is unaware of. An optic section should be used to determine the depth; however, in some cases—especially if there is corneal edema—it is difficult to visualize.
Anterior segment OCT (AS-OCT) can help determine the depth in unclear cases; it will typically show a hyper-reflective lesion representing the foreign body material. The foreign body will also cause shadowing of the corneal layers corresponding to its location.6 Thus, the high resolution of AS-OCT provides detailed information that can be used to determine the most appropriate removal technique (Figures 1 and 2).
Understanding exact depth and location is also helpful in predicting prognosis. Objects that have penetrated the stroma will produce a scar, which can result in decreased vision if the object is within or near the visual axis. In addition to detailed characteristics of the foreign body, AS-OCT can provide information on the status of the surrounding tissue, the integrity of Descemet’s membrane (i.e., risk for impending perforation) and even identify any missed lesions that were not previously visible on slit lamp examination.6
Next comes determining whether or not the foreign body actually needs to be removed. If it is not penetrating the globe, it’s best to go ahead and remove it. Inert objects such as sand and glass are well-tolerated in the cornea without resulting in a tissue reaction. If an inert object cannot be removed without significant risk and is not in the visual axis, it can be left in place with close monitoring of the patient.7 In contrast, organic substances (vegetative materials) and metals are poorly tolerated by the cornea, resulting in edema, scarring, inflammation, neovascularization and stromal necrosis. These substances must be promptly removed.6
#3: Choose the Best Tool for the Job
If the foreign body is superficial, it can sometimes be rinsed away via ocular irrigation with sterile saline or wiped away with a moist cotton-tipped applicator. If the foreign body is embedded, more invasive tools are necessary: golf spud, jewelers forceps, magnetic probe and small-gauge needles (Figure 3). Rust rings may be removed with either a small-gauge needle or an ophthalmic burr/Algerbrush.
Here are some rules of thumb to take into consideration when selecting which instrument to use:
• Make sure instruments are sterile.
• Use the least invasive technique that will allow for safe and effective removal.
• Attempt to remove superficial objects with a moistened sterile cotton-tipped applicator. This is best for objects like eyelashes or hairs that are resting on the conjunctiva. Avoid using a cotton-tipped applicator on the cornea. Due to the size of the cotton tip, it could embed the foreign body further into the cornea or cause a large area of epithelial disruption.
• Consider using a magnetic spud for superficial metallic foreign bodies. This will allow you to easily lift superficial metallic objects without causing significant damage to the surrounding tissues. This is also helpful for retrieval and cleanup of any loose flakes of metal that may have been dislodged onto the ocular surface during removal.
• Foreign body spuds (also referred to as golf club spuds due to their characteristic shape) are useful for removing embedded foreign bodies that require excavating, scraping or flicking to dislodge. Due to the blunt edge of the spud, there is minimal risk of perforation.
• Jewelers forceps are helpful in grasping vegetative material that protrudes outward from the ocular surface or lifting off material that is loosely adhered to the surface.
• When used properly, a small-gauge disposable needle, such as the 25-gauge 5/8” is a good all-around tool that results in minimal damage.
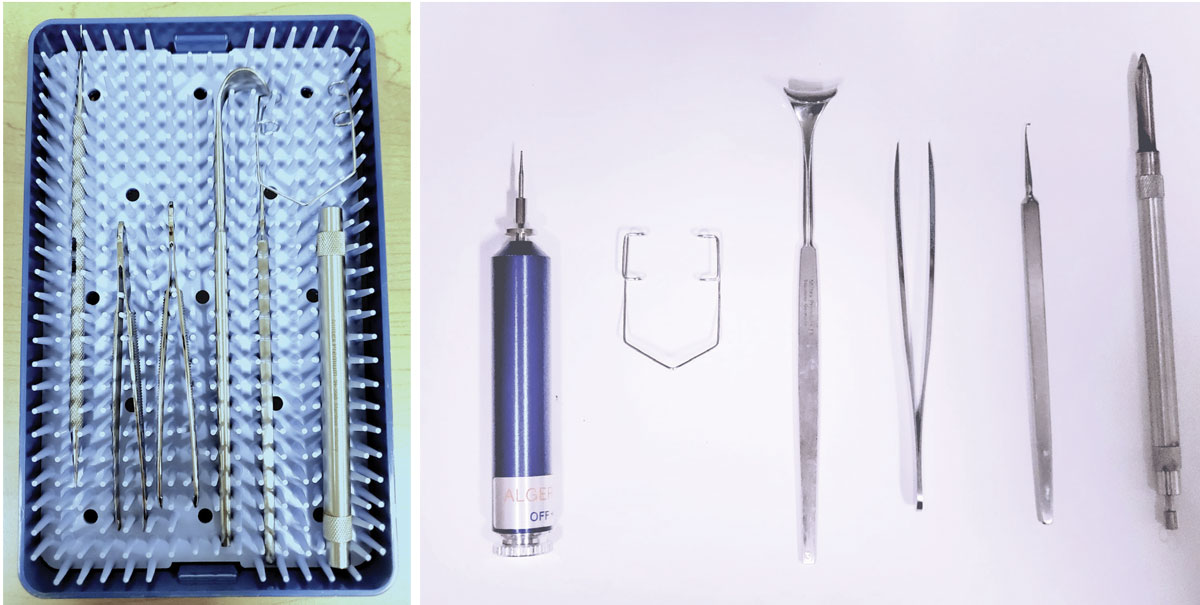 |
Fig. 3. Foreign body removal kit (left). Instruments from left to right: Algerbrush, speculum, eyelid retractor, jewelers forceps, golf club spud and magnetic probe (right). Click image to enlarge. |
#4: Ensure Patient Consent
Prior to foreign body removal, explain the procedure, risks, benefits and alternatives to the patient and obtain written consent (or document verbal consent in your chart).
Ensure patient comfort and cooperation by properly anesthetizing the ocular surface with topical anesthetic drops such as proparacaine 0.5% or tetracaine 0.5%. Instill one or two drops of anesthetic into the lower cul-de-sac of the eye and wait at least 30 seconds before starting the procedure. Instillation of topical anesthetic into the fellow eye will aid in reducing blink reflex and increasing patient cooperation.
For best stabilization and visualization, a slit lamp should be used with the patient’s forehead securely placed against the forehead rest. Identify a fixation target that will ensure proper and steady alignment of the eye and reduce risk of eye movement during the procedure. Instruct the patient to fixate on the target using the opposite eye. Occasionally, the use of an eyelid speculum is required for patients who are less cooperative or have a strong blink reflex.
#5: Optimize Stability During Removal
Stability is key when performing foreign body removal. Stabilize your arm using the slit lamp table or an arm rest. Hold the instrument like a pencil between your thumb and forefinger. Rest your fourth and fifth fingers holding the instrument on the patient’s cheek, bridge of nose or upright bar of the slit lamp. Align your instrument by sighting outside of the slit lamp, positioning it in front of the foreign body at an angle tangential to the ocular surface. It’s imperative that you always approach the eye tangentially in order to prevent perforating the eye or further embedding the foreign body into the eye. Once properly aligned, look through the oculars as you perform the remainder of the procedure. Secure the upper eyelid with your free hand and use the instrument to remove the foreign body.
When using a cotton-tipped applicator, foreign bodies can be removed by gently tapping the moistened tip to the object and lifting it off of the tissue. If the foreign body is conjunctival, you can use a gentle swiping motion if necessary. Avoid any swiping motions on the cornea as this could cause an abrasion.
When using forceps, gently clasp the object and lift it off of the tissue, and avoid pinching the surface of the eye.
When using a needle, position it with the bevel facing outward, toward you. With small strokes, use it to loosen the edges of the foreign body. Then, with the tip of the needle positioned just under the edge of the foreign body, use a subtle flicking motion to release it from the corneal surface. Make sure to maintain a tangential angle to the globe throughout this procedure.
When using a spud, the instrument should be handled in a similar manner as the needle, using the tip of the spud to tease out the edges of the foreign body and then using a flicking motion to release it from the surface of the cornea (Figure 4).
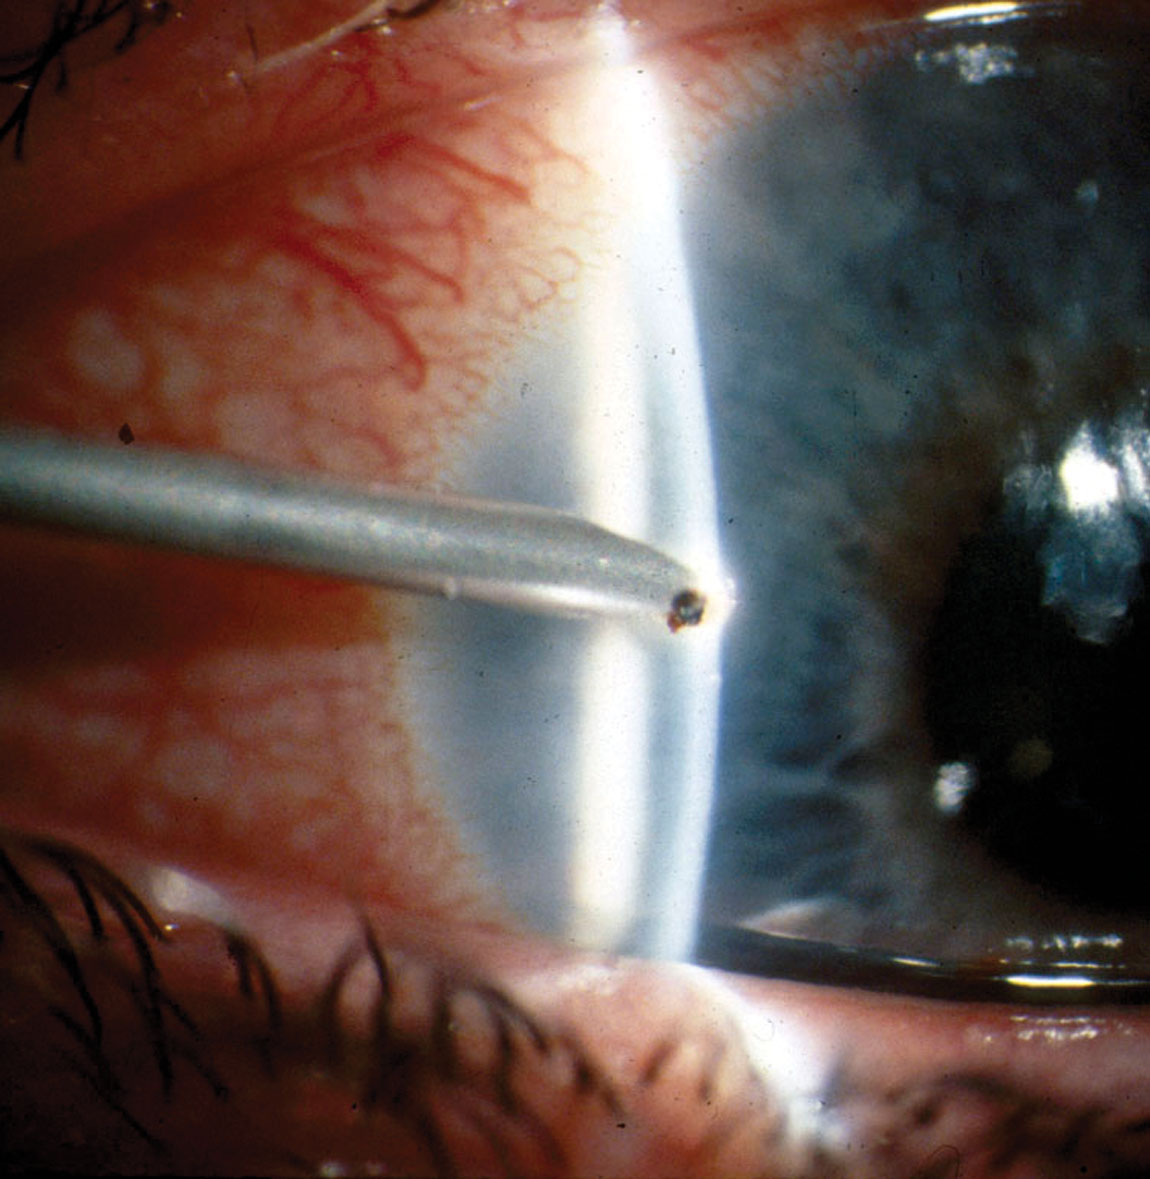 |
Fig. 4. Spud removal of a metallic foreign body. Photo by Walter Potaznick, OD. Click image to enlarge. |
#6: Double Check, Irrigate and Document
Once you have successfully removed the foreign body, irrigate the eye with sterile saline solution and re-examine with the slit lamp. Document the size, location and depth of the resultant epithelial defect.
#7: Remove Any Rust at Initial Visit
Metallic (ferrous) ocular foreign bodies begin to oxidize, forming rust at the injury site within just a few hours of becoming embedded in the cornea. The resulting rust usually forms a ring around the metallic foreign body (Figure 5). If left there, this rust ring can cause an immune response, resulting in extended healing time, inflammation, tissue damage and stromal necrosis.8-9 Therefore, it is best to remove as much of the rust as possible, as soon as possible.
An Algerbrush—a small, low-speed, battery-operated drill that is fitted with a tiny dental burr—is commonly used for removal. To alleviate patient apprehension during this technique, mention that the Algerbrush makes a soft whirring noise. The device has a built-in clutch mechanism that will stop the instrument when a certain degree of resistance is encountered. Therefore, when an Algerbrush contacts Bowman’s membrane, it will automatically shut off. This safety measure assumes proper use of the instrument, using a tangential approach, and that the foreign body itself is not penetrating Bowman’s membrane. In cases where the foreign body is penetrating Bowman’s, there is no longer enough resistance to initiate the stop.9
 |
Fig. 5. Metallic foreign body with rust ring. Photo by Walter Potaznick, OD. Click image to enlarge. |
When using the Algerbrush, approach the cornea tangentially and apply it to the rust ring with very little pressure; allow the spinning motion of the burr on the cornea to do the work for you. Lightly contact the rotating burr with all areas of the rust ring. There should be minimal hand movement, with the exception of moving the instrument to a different part of the rust ring. Occasionally, it is necessary to switch the Algerbrush to your opposite hand in order to take advantage of the now reversed rotation of the burr to remove any resistant rust.
Alternatively, you may use a spud or needle to remove the rust ring, always keeping the instrument tangential to the cornea. Use small motions to scrape away the epithelium that contains the rust.
Ideally, you should remove as much rust as possible during the initial visit in avoid an inflammatory response (Figure 6). However, very deep stromal rust may be left in place if you feel it would be unsafe to attempt to remove it at that visit. Keep in mind: aggressive and widespread use of the burr within the stroma can lead to increased scarring.9 Thus, in cases of deep stromal rust, it is best to remove only the superficial rust and leave the rest for removal at a follow-up visit.
As the cornea heals, the residual rust will move more anteriorly, allowing for easier removal with less risk of long-term scarring. In some cases, it takes several visits to remove all of the rust. At the conclusion of the procedure, rinse the eye with sterile saline, re-examine the eye with the slit lamp and document the extent of the corneal defect. You may instill a drop of broad-spectrum topical antibiotic for prophylactic coverage.
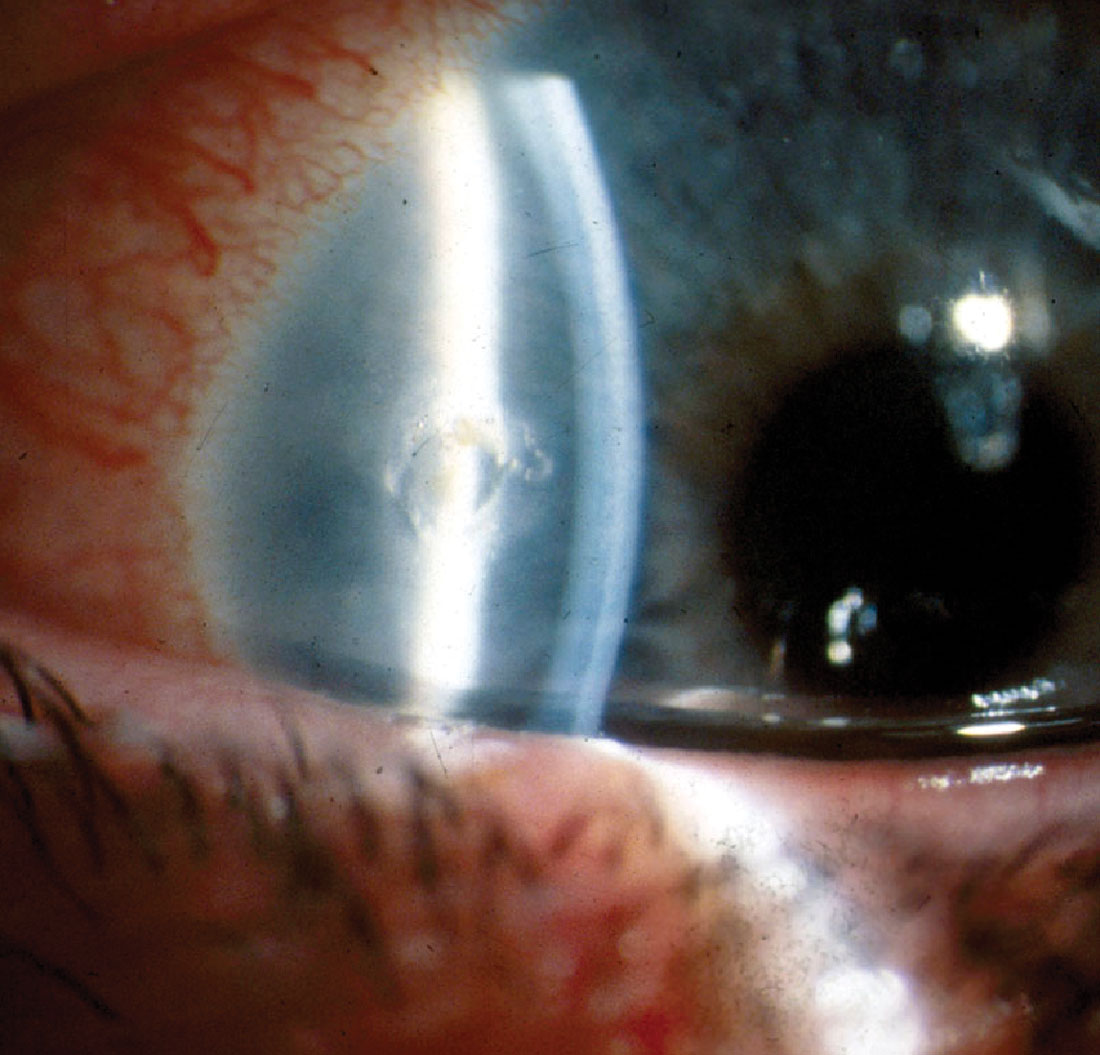 |
Fig. 6. Corneal epithelial defect immediately following foreign body removal with an Algerbrush. Photo by Walter Potaznick, OD. Click image to enlarge. |
#8: Treat With Antibiotics
Postoperative care involves prevention of infection, control of pain and inflammation and monitoring for complications. As a rule of thumb, the patient should be treated with a broad-spectrum antibiotic, such as a fluoroquinolone, four times per day for one week or until the defect has re-epithelialized.10 In cases of large corneal defects or conjunctival defects, antibiotic ointment may be preferred due to longer coverage as well as cushioning for comfort. A cycloplegic, such as cyclopentolate or homatropine, can be prescribed twice per day if there is significant pain or inflammation.
Topical ophthalmic NSAIDs can also be considered for treatment of pain in foreign body patients; however, these medications are not ideal in such cases, as they can lead to compromised corneal healing. Over-the-counter oral analgesics such as acetaminophen and ibuprofen are rarely indicated but can be considered if there is considerable pain.
In cases of excessive inflammation, topical corticosteroids can be used but only after re-epithelialization of the defect.8-10 Steroids should also be considered if the foreign body is deep/stromal and central to help reduce the amount of scarring. However, steroids should not be used with vegetative/organic/soil-based foreign bodies due to increased risk of fungal infection. Amniotic membranes are another treatment option for deep central foreign bodies.10
For larger corneal defects, treatment with a bandage contact lens is particularly effective for reducing pain and minimizing tissue disruption that is associated with the movement of the eyelid over the defect. However, this would be contraindicated in cases in which the foreign body was organic or vegetative due to risk of fungal keratitis.10 If a bandage contact lens is used, it is important to see the patient in 24 hours.
At the follow-up visit, the contact lens should be removed and the cornea examined. Continue bandage contact lens treatment until the epithelial defect has healed. Monitor closely, as bandage contact lenses can create an environment more susceptible to infection.
If the foreign body material is organic or vegetative and the patient is at high risk for fungal keratitis, treatment with topical and/or oral anti-fungal medication can be considered.
#9: Monitor Outcomes
Patients should be seen for follow-up in 24 hours. Typically, there is significant healing and reduction in pain within the first 24 to 72 hours (Figure 7). Monitor for complications such as non-healing infection, edema, iritis, recurrent corneal erosions and visually significant scarring. If any complications are found, treat appropriately and refer to a specialist when indicated.
 |
Fig. 7. Healed epithelial defect with trace remaining rust seen at foreign body removal follow-up. Photo by Walter Potaznick, OD. Click image to enlarge. |
#10: Prevent Future Injuries
One of the most important aspects of postoperative care is providing patient education on the importance of wearing well-fitted safety goggles while performing high-risk activities. Make sure your patient has appropriate safety eyewear, and if not, help them obtain it, as well as explain and demonstrate proper use.
Ocular foreign body removal is a rewarding and skilled service that you can provide to your surrounding community. By following these clinical pearls, you can remove them with confidence, ease and without undue complications, giving your patients much-needed relief.
Dr. Hendricks is an associate professor of optometry at Massachusetts College of Pharmacy and Health Sciences (MCPHS) University School of Optometry, chief of services for the Glaucoma Clinic (The Eye and Vision Center at MCPHS) and practices at the Eye and Vision Center at MCPHS and Edward M. Kennedy Community Health Center. She completed her residency in ocular disease in the VA Boston Healthcare System and served as faculty at the New England College of Optometry before joining MCPHS University in 2017. She has no financial disclosures.
1. Bowes Hamill M. Mechanical Injury. In: Krachmer JH, Mannis MJ, Holland EJ. eds. Cornea. 2nd ed. St. Louis: Mosby. 2004;749-76. 2. Parke DW II, Flynn HW Jr, Fisher YL. Management of intraocular foreign bodies: a clinical flight plan. Can J Ophthalmol. 2013;48:8-12. 3. Fraenkel A, Lee LR, Lee GA. Managing corneal foreign bodies in office-based general practice. Aust Fam Physician. 2017;46(3):89-93. 4. Bowling B, Kanski JJ. Kanski’s Clinical Ophthalmology: A Systematic Approach. 8th ed. Edinburgh: Elsevier. 2016;878-81. 5. Loporchio D, Mukkamala L, Gorukanti K, et al. Intraocular foreign bodies: a review. Surv Ophthalmol. 2016;61(5):582-96. 6. Celebi AR, Kilavuzoglu AE, Altiparmak UE, et al. The role of anterior segment optical coherence tomography in the management of an intra-corneal foreign body. Springerplus. 2016;5(1):1559. 7. Arora T, Arora S, Sinha R. Management of intrastromal glass foreign body based on anterior segment optical coherence tomography and Pentacam analysis. Int Ophthalmol. 2015;35:1. 8. Koetting C. Foreign body removal start to finish. Rev Optom. 2020;157(4):30. 9. Bronner A. No insult to injury: managing foreign body removal: here’s what you need to know about this common corneal trauma to yield the best outcomes for your patients. Rev Optom. 2017;154(1):47-54. 10. Jayamanne DG, Bell RWNon-penetrating corneal foreign body injuries: factors affecting delay in rehabilitation of patients. Emergency Medicine Journal. 1994;11:195-7. |