A great debate seems to rage in optometry circles concerning the pronunciation of gonioscopy. Whether you say “go-knee-ah-scopy” or “gah-knee-ah-scopy” largely depends on your particular geographical location or optometry school alma mater. Regardless of which side of this great schism you find yourself, the examination technique itself remains one of the most illuminating available for optometrists.
It is essential in differentiating glaucoma subtype and determining proper medical or surgical treatment interventions. In addition to its use in the classification of glaucoma, gonioscopy aids in evaluation of iris cysts and tumors, examination of neovascularization of the anterior chamber angle, and in the search for intraocular foreign bodies.
Although the value of gonioscopy is evident, two separate studies reviewing patient records show that less than half of primary open angle glaucoma (POAG) patients had a single gonioscopy procedure during their initial glaucoma workup.1,2 Perhaps, clinicians find it difficult to obtain adequate views due to improper technique, poor patient cooperation or lack of practice. This could be due, in part, to increased use of newer technologies such as anterior chamber OCT, ultrasound biomicroscopy or an over-reliance on Van Herick angle estimation. New technologies enable us to evaluate patients in new ways, and even allow optometric physicians to delegate more to technicians. As beneficial as new techniques are, only gonioscopy allows us to visualize the entire anterior chamber angle. Gonioscopy is the only technique which permits clinicians to see the angle in true color, as opposed to cross-sectional images interpolated and presented on a screen.
 |  |
| To get a good view, make sure your patient has his chin on the chin rest and forehead up against the forehead rest. | Make sure to explain to the patient that you’re going to contact the eye. Don’t be afraid to use a little gentle pressure to suction the lens onto the eye. Make sure the lens you’re using is the proper lens for the angle you’re trying to vizualize. |
Because light rays from the anterior chamber angle undergo total internal reflection at the cornea-air interface, it is impossible to view the angle unaided. This is why we need a gonioscopy lens. Light rays are able to pass directly into the lens because of its higher index of refraction, then continue through the lens to be viewed by the clinician. This ability to see the angle in vivo assists in evaluating angle pigmentation, recognizing blood in Schlemm’s canal and quickly differentiating between apositional and synechial angle closure.
This article provides a review of proper gonioscopy techniques and strategies to be successful, even with your most apprehensive patients. So sit back, relax and enjoy your favorite carbonated beverage, be it a soda, cola or pop. No matter where you live, what school you went to or what you call it, the techniques and skills required for successful gonioscopy are the same.
The Lenses
Direct or indirect? Goldmann or Sussman? Three-mirror or four-mirror or six-mirror? Flange or no-flange? There are many types of gonioscopy lenses to view the angle, and the one you should use depends on what you’re trying to view.
 |
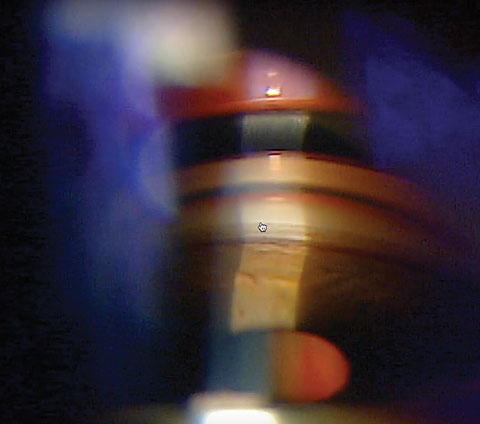
| Gonioscopy helps doctors see, from posterior to anterior, the iris, ciliary body band, scleral spur, posterior pigmented trabecular meswork, anterior less-pigmented trabecular meshwork and Schwalbe’s line. Click image to enlarge. |
Direct lenses are typically only used by glaucoma surgeons. These are thick convex lenses used in the operating room on sedated, supine patients. Direct lenses are quite impractical in the optometric clinical setting. In contrast, indirect gonioscopy lenses have a concave contact surface and use a mirror to reflect light from the angle to the observer. This method of gonioscopy is practical and easy to perform with an upright patient seated at a slit lamp.
Indirect lenses use a mirror to reflect light rays exiting the angle towards the examiner and provide a mirror image of the angle opposite the mirror. Numerous styles of indirect lenses exist, with variable numbers of mirrors and radii of curvature of the portion which contacts the cornea. They can generally be classified as large-diameter lenses, which do not compress the cornea, and small-diameter lenses capable of compression gonioscopy.
When Good Angles Go BadExamining patients using gonioscopy can reveal these potential concerns. Hyperpigmentation. Patients with hyperpigmentation need to be monitored for the development of pigment dispersion syndrome or glaucoma, pseudoexfoliation syndrome or glaucoma, or angle recession since it is likely the result of trauma which can liberate pigment into the angle. Posterior embryotoxon. This is an anteriorly displaced Schwalbe’s line. Under slit lamp examination you will see a thin, white line usually at the temporal limbus. This junction between the trabecular meshwork and cornea can form a ridge that follows the curve of the limbus. A posterior embryotoxon can be present in up to 24% of the population and is a benign finding in isolation, but it can be associated with conditions with a high prevalence of glaucoma.9,10 Occasionally you will find small iris strands, or iris processes, that will reach forward and adhere to the posterior embryotoxon. Again, in mild cases this is not a concern, but severe cases of iris processes can impede the outflow of aqueous. Sampaolesi’s line. When pigment is found anterior to or along Schwalbe’s line, it is called a Sampaolesi’s line. Although this can be idiopathic, the presence of a Sampaolesi’s line can be associated with both pigmentary syndrome and glaucoma and pseudoexfoliation syndrome and glaucoma. If you are seeing a Sampaolesi’s line, you will typically have hyperpigmentation throughout the angle, especially in the trabecular meshwork. Are you seeing red? There will come a time when you will see blood in Schlemm’s canal. This is a sign of elevated pressure in the eye or increased episcleral venous pressure, which could even be from your gonio lens. Other etiologies of increased episcleral venous pressure may come from Sturge-Weber syndrome, a dural or carotid cavernous sinus fistula, superior vena cava obstruction or thyroid ophthalmopathy.11 Of course, other red views could include a hyphema from a recent ocular injury or the dreaded neovascularization. You are likely aware of the possibility of neovascularization because retinal pathology can precede the new vessel growth within the angle due to relative ischemia, but this is still an alarming finding because it can lead to sight-threatening neovascular glaucoma. |
The Goldmann three-mirror lens is a common, large-diameter indirect lens and, likely, the first one you encountered as an optometry student. The smallest and steepest mirror is used for gonioscopy, while the other two mirrors and the central lens are used for evaluation of the retina. This makes the three-mirror lens a particularly valuable multipurpose tool. Because of its larger diameter, and steeper curvature than the human cornea, it requires a coupling substance to fill the gap between the lens and cornea. The Goldmann lens provides an excellent view of the angle and usually produces some amount of suction on the cornea, aiding in maintaining the lens on the subject’s eye. Because of its outstanding optics and ease of handling, this lens is particularly useful for beginners.3
Smaller-diameter lenses, such as the Sussman or Posner four-mirror lenses, are shallow and have a curvature similar to that of the human cornea, so they do not require a coupling agent. These lenses are valuable in indentation gonioscopy—also known as compression gonioscopy—which is very useful in the differentiation of angle closure pathologies.4 Many glaucoma specialists prefer the Posner lens as the handle makes for a convenient and smooth “pivot” of the lens onto the cornea.
 |
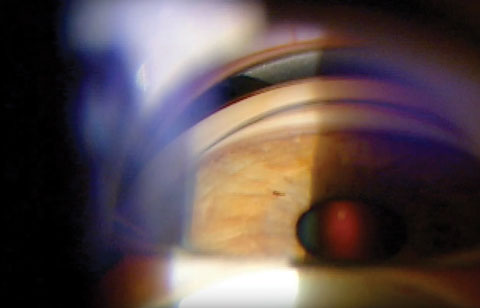
| In interpreting the view, note how open the angle is, the most posterior structure you can see (in this case it’s the ciliary body band) and how much pigment is in the trabecular meshwork. Click image to enlarge. |
Both types of lenses have a place in the primary care setting for your glaucoma patients, and we would suggest you have one of each in your toolbox.
Getting Your Gonioscopy View
Before we begin a stepwise approach to successful gonioscopy, we want to stress that what you see in the slit lamp is not a static picture. Examiners must remain cognizant that they are dealing with living, responsive and deformable tissues. Normal pupil responses (and their subsequent effects on iris conformation) and ocular tissue and fluid dynamics are completely in play during the procedure. Room illumination, slit lamp light entering the pupil, too much pressure exerted on the examination lens or, in the case of a lens requiring coupling solution, suction on the cornea accompanied by pressure away from the cornea all can change the appearance of the angle.
Indications for Peripheral IridotomyThe classic indication for laser peripheral iridotomy (LPI) is a primary acute angle closure attack, in which case the signs may be obvious. Less severe cases may present to the office with symptoms of intermittent angle closure such as pain, redness and blurred vision after pupil dilation or when they are in a dimly lit room. However, many occludable, and thus at-risk eyes, present asymptomatically, but with signs observable on gonioscopy, which, if seen, can prevent an angle closure attack in the first place. This is where gonioscopy is particularly useful. We believe LPI is useful for eyes in which TM is not visible in at least two quadrants, particularly when signs—such as patchy pigmentation, signifying likely prior intermittent closure—are present. Other factors such as age over 60, female gender, hyperopia and a family history may also bolster the decision for prophylactic treatment. |
Step 1: Explain the procedure to the patient. Patients invariably express some degree of apprehension when having anything near their eyes. Patients are much more likely to cooperate if they understand what procedures are being performed and why. Let the patient know that the lens will touch the eye, but will not cause significant discomfort. For those of you who may struggle with how to discuss this procedure with your patients, we’ve provided a video demonstrating our technique as well as our typical conversation with patients.
Step 2: Instill one or two drops of topical ophthalmic anesthetic, such as 0.5% proparacaine, into both eyes. Even if you plan to do the procedure only on one eye, it helps slow the blink rate, which can aid in ease of the procedure.
Step 3: When using the Goldmann three-mirror lens, fill the lens half way with a coupling solution, such as 2.5% methylcellulose or 1% carboxymethylcellulose. There are advantages to each type of medium. Methylcellulose provides a much sharper, high definition image compared with carboxymethylcellulose. However, methylcellulose is much more toxic to the cornea and must be irrigated from the patient’s eye. The Sussman lens does not require coupling solution.
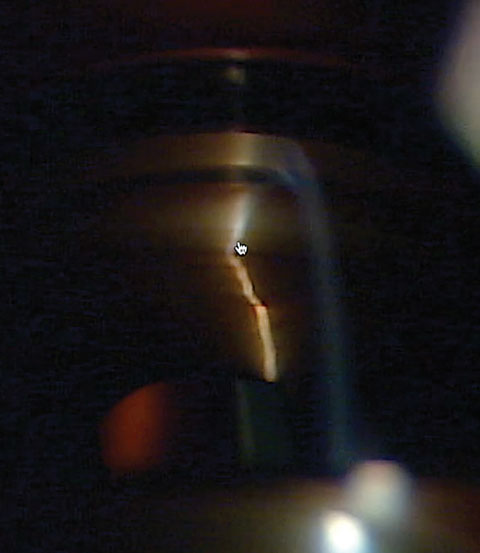 |
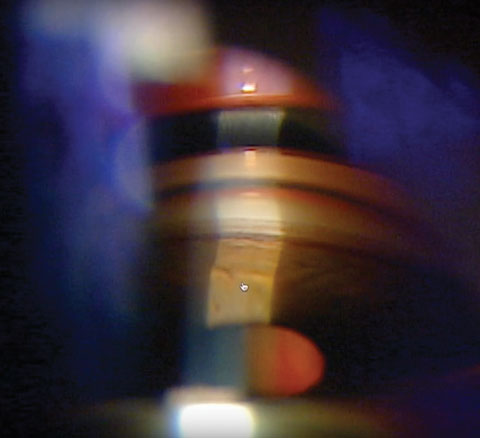
| If it’s difficult to tell between the ciliary body band and the pigmented trabecular meshwork, or in a particularly stubborn angle where all structures are difficult to identify, you can use the corneal wedge technique to help find your landmarks. When you use the wedge, make your beam as bright and narrow as possible. The place where the two beams come together to form the wedge will always be Schwalbe’s line. The pointer exposes the wedge in this picture. Click image to enlarge. |
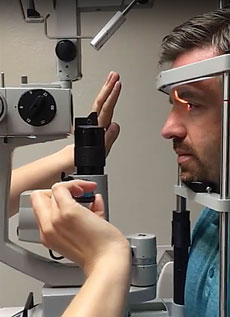
Step 4: Situate the patient comfortably in the slit lamp and ensure they’re at an appropriate level with the lateral canthus marking on the lamp. This will allow easy movement between mirrors without having to readjust the patient after the lens is placed on the eye. Ideally, the patient’s back will be straight and they are not straining to keep their forehead against the headrest. Advise your patient to keep their forehead against the strap, chin in the chinrest and both eyes open—but always keep their teeth together.
Step 5: Dim the ambient lights such that the room is almost dark. Ensure that the slit beam is in click. A good starting point for your slit lamp settings is to use a magnification of 10x and a narrow and short light beam that does not enter the pupil and artificially open the iridocorneal angle.
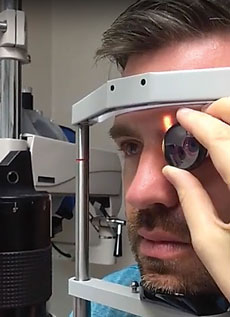
Step 6: Apply the lens. For the Goldmann three-mirror, there are a couple of different ways to do this. For less experienced clinicians, a two-handed approach is in order. Tell the patient to look up. Gently pull down the patient’s lower eyelid with your left thumb while you pin the upper lid against the brow using your forefinger. With your right hand, place the gonioscopy lens slightly tilted so as to keep from spilling the coupling solution into the inferior fornix and then quickly tilt the lens onto the cornea. Have the patient look straight ahead, release the upper lid, and exchange hands. Alternatively—and somewhat more efficiently, though difficult for beginners—use your left hand alone to hold the gonioscopy lens while your third finger pulls down the lower eyelid and your second finger pins the upper lid as the patient is looking up. Tilt the lens into the lower cul-de-sac and then pivot onto the cornea. Ask the patient to look straight ahead and release the eyelids. To balance the hand, rest the fingers against the forehead rest and the heel of the hand against the patient’s cheek.
Step 7: Removing the lens usually requires the patient to squeeze his eyes closed. Sometimes gentle pressure from the examiner’s forefinger against the globe is required to break suction.5,6 As with all things, practice makes perfect.
With the Sussman four-mirror, the procedure is less complicated. To examine the patient’s right eye, hold the Sussman lens with your thumb and forefinger. Instruct the patient to look down. Pin the upper lid with your second finger. Next, instruct the patient to look straight ahead. Use your third finger to gently depress the patient’s lower eyelid. Next, place the lens gently against the cornea. Depending on patient cooperation, you may release the lids at this point. To balance the hand, rest your fingers against the patient’s forehead and the heel of your hand against the patient’s cheek.
Gonioscopy can be difficult for clinicians with short arms. Using the goniolens case or a tissue box on which to rest the elbow can be helpful. In addition, commercially available elbow rests can also be used.
Interpreting Your Gonioscopy View
The key to correctly interpreting and recording your view is to always perform the procedure in the same manner so you have consistent results. We recommend always starting your gonioscopy by viewing the inferior angle. This is typically the widest angle and the easiest to identify structures due to the increased pigmentation. Remember that, with indirect gonioscopy, your mirror is 180° away from the angle you are viewing.
 |
| At this angle, the iris, ciliary body band, scleral spur, posterior pigmented trabecular meshwork, anterior nonpigmented trabecular meshwork and Schwalbe’s line are all visible. Visualizing these structures can provide invaluable information in open angle glaucoma, narrow angle glaucoma and other anterior segment pathologies. Click image to enlarge. |
To view the inferior angle, start with the mirror at 12 o’clock. Rotating clockwise will help you to remember the location of any abnormal findings. Begin with low magnification and increase as necessary to obtain more detail. Sometimes, especially in lightly pigmented patients, details are difficult to ascertain. In these cases, we employ a special technique called a “corneal wedge.” The corneal wedge is a very bright, razor thin slit beam, with the light source moved approximately 10 to 20 degrees off-axis. The corneal wedge will reveal Schwalbe’s line as the point at which two prominent corneal reflections come together.
Structures
The anterior limit of the trabeculum, where it meets the posterior termination of Descemet’s membrane, creates an irregular, opaque line called Schwalbe’s line. This line may be difficult to view in young people who typically have less pigmentation in the angle. The corneal wedge technique is helpful in identifying an inconspicuous Schwalbe’s line.
The trabeculum lies posterior to Schwalbe’s line and ends at the scleral spur. It has two parts, an anterior, nonfunctional part and a posterior, functional aspect. As a person ages, the posterior portion becomes increasingly pigmented due to trabecular outflow and the associated pigment debris. Pigmentation is unusual prior to puberty, and a patchy pigment distribution should raise suspicion of intermittent iris contact. Deep to the trabecular meshwork lies Schlemm’s canal, which should appear as a dark line. Blood in the canal indicates a higher than normal episcleral venous pressure.
The ciliary body presents as the most posterior angle structure, and pigmentation varies from no pigment (pink) to dark brown to slate gray.6-8
Tips for Difficult Angles
Sometimes, the angle structures are difficult to view, either because of little-to-no pigmentation, or because the view of the angle is obscured by a forward bowing iris, as seen with iris bombe.
In the case of a lightly pigmented angle, it helps to start with the inferior angle, as it will be the widest and most pigmented. Once you’ve identified the structures here, you will be familiar with the anatomy of the particular patient and comfortable identifying structures in the other quadrants. In addition, the corneal wedge technique comes in handy in these situations. Note that this technique can only be performed successfully in the superior and inferior quadrants, as it requires the light source to be off-axis.
When the angle is obscured by a steep midperipheral iris, tilting the lens in the direction of the angle you want to view or having the patient look slightly in the direction of the observation mirror will allow the light rays to pass over the obstructing iris and into the angle, allowing a view.
To distinguish between synechial and appositional angle closure, use the small-diameter goniolens to apply gentle pressure against the patient’s cornea. There should be enough pressure to cause wrinkling of the cornea. This pressure should push anterior chamber aqueous against the iris/lens diaphragm, and widen an appositional angle closure. In the case of a synechial closure or plateau iris, the angle will not widen with pressure. This compression gonioscopy technique is helpful in considering whether a patient would benefit from a laser peripheral iridotomy (LPI). If there is no significant improvement/opening of the angle with compression, then an LPI probably wouldn’t help in a narrow angle patient.
With an aging population, the incidence of glaucoma is likely to increase. As primary eye care providers, we want to make sure we employ all the tools available to provide the highest quality of care possible.
Gonioscopy is an easy to perform—and invaluable—procedure. Don’t let the angle get the best of you.
|
1. Fremont, AM. Patterns of care for open-angle glaucoma in managed care. Archives of Ophthalmology. 2003 June;121(6):777-83. 2. Hertzog, LH, Albrecht KG, LaBree L, Lee PP. Glaucoma care and conformance with preferred practice patterns. Examination of the private, community-based ophthalmologist. Ophthalmology. 1996 July;103(7):1009-13. 3. Casser L, Murray F, Woodcome HT. Gonioscopy: Three-mirror Lens. In: Atlas of Primary Eyecare Procedures. 2nd Ed. Norwalk, Connecticut: Appleton & Lange;1997:74-87. 4. Casser L, Murray F, Woodcome HT. Gonioscopy: Four-mirror lens. In: Atlas of Primary Eyecare Procedures. 2nd Ed. Norwalk, Connecticut: Appleton & Lange;1997:88-92. 5. Faschinger C, Hommer A. How to Perform Gonioscopy. In: Gonioscopy. 1st ed. Springer;2012:5-10. 6. Kanski JJ, Bowling B. Glaucoma. In: Clinical ophthalmology: A systematic approach. 7th ed. Elsevier-Saunders;2011:316-23. 7. Faschinger C, Hommer A. Anatomical structures of the chamber angle. In: Gonioscopy. 1st ed. Springer;2012:11-23. 8. Remington LA. Anterior chamber angle. In: Clinical anatomy of the visual system. 2nd ed. Elsevier;2005:103-8. 9. Ozeki H, Shirai S, Majima A, et al. Clinical evaluation of posterior embryotoxon in one institution. Japanese J Ophthalmol. 1997;41(6)422-25. 10. Rennie CA, Chowdhury S, Khan J, et al. The prevalence and associated features of posterior embryotoxon in the general ophthalmic clinic. Eye (London). 2005 April;19(4)396-9. 11. Greenfield DS. Glaucoma associated with elevated episcleral venous pressure. Journal of Glaucoma. 2000;9(2)190-94. |