 |
|
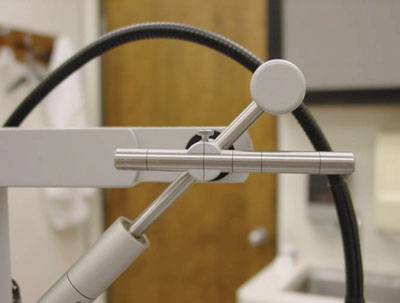
How often do you verify that your tonometer is calibrated? Have you ever checked it? If it’s off just a few millimeters, it could affect your glaucoma treatment decisions. To verify it, use the calibration check weight (above) that came with your slit lamp.
|
Consider your trusty Goldmann tonometer: Constant use and inadvertent abuse will eventually set it out of calibration, which means you’ll be getting the wrong readings on your intraocular pressure measurements.
Think of it this way: Would lowering IOP by a few millimeters make a difference for a patient with progressing, advanced glaucoma? Then it is important to verify the calibration on your tonometer. It could easily be off, giving you false readings—IOPs that are too low or too high.
While you’re at it, check your visual acuity chart projector for accuracy and reevaluate your disinfection and sterilization methods.
This article explains how.
Check Tonometer Calibration
How long has it been since you’ve checked the calibration on your Goldmann tonometer? Have you ever done it? When we initially took calibration more seriously at our clinic, we found that one of our Goldmann applanation tonometers was off by 6mm Hg!
We want to be sure that every time the patient comes in, he gets the exact same tonometry test from visit to visit and from exam room to exam room. That’s why it’s so important to keep your tonometer calibrated, and to verify it regularly.
Manufacturers suggest you verify it monthly. But a more “real world” schedule is every six months. Here’s how it’s done:
• First, dig out the calibration test kit that came with your slit lamp. If you can’t locate it in the back of a drawer or on a dusty shelf, contact your manufacturer or equipment rep for a replacement kit.
• Place the calibration instrument properly on the tonometer. Swing the tonometer arm, with the tonometer probe in place, into working position and set the pressure dial to zero.
|
High-Level Disinfection
in Three Effective Ways We have three different ways to achieve high-level disinfection for instruments and patient care items that have come in contact with mucous membranes or tears. First, of course, the instrument should be cleaned to remove debris and then dried prior to immersion in: • 10-minute soak in 3% hydrogen peroxide • 15-minute soak in diluted (1:10) bleach solution • 20-minute soak in 2% glutaraldehyde Each of these options has its own advantages and disadvantages. Cost is one consideration; while bleach and hydrogen peroxide are inexpensive, glutaraldehyde disinfection system is significantly more costly. Shelf life is another issue; most glutaraldehyde-based disinfectants are available in 14- or 28-day solutions. Also, while glutaraldehyde does provide a broad spectrum of virucidal activity, it can be very harsh to the skin and requires anyone who handles the solution to wear protective gloves and eyewear. It must also be used and stored in a well-ventilated area. Another concern is that not all items can be used with any disinfectant. Manufacturers recommend that tonometer tips be soaked in hydrogen peroxide or bleach solution, and not soaked for more than one hour or they may become damaged. Fundus contact lenses, such as gonioscopy lenses, should not be disinfected with hydrogen peroxide or alcohol as it may damage the lenses; a short 15-minute soak in diluted bleach or a 20-minute soak in glutaraldehyde is probably the best option for these lenses. |
• Align the weight with the marking for 20mm Hg (the second hashmark from either end). Gently increase the pressure on the dial and watch the probe carefully. Stop when the probe moves slightly and make a note of the pressure shown on the dial.
• Obtain the reversal by decreasing the pressure and watching for movement of the probe again. Record the average of the two readings. This average approximates your actual tonometric reading.
• Repeat the test at the 60mm Hg setting (the first hashmark from either end).
For example, let’s say that the first reading you get when you turn the dial to increase pressure is 24mm Hg. Then when you obtain the reversal, it reads 22mm Hg. Taking the average of those two readings gives you 23mm Hg. Because you’re testing at 20mm Hg, this means your tonometer is off by an extra 3mm Hg.
To fix it, you’ll need to call your technician to properly adjust your tonometer.
Don’t simply make a “paper adjustment”—that is, don’t fudge the measurement by subtracting 3mm Hg from every reading you now record. Do it right. Make the call to the technician and get it perfectly calibrated.
Check Your Chart Projector
The Snellen chart is supposed to test visual acuity at a distance of 20 feet, yet I can’t remember the last time I saw an exam lane in a practice that’s actually 20 feet long. Instead, we work in smaller exam rooms that use mirrors to optically “fold” that 20-foot distance. Because of this, any discrepancy in the originally-designed distance between the patient and the chart will be magnified, which will throw off every patient’s visual acuity measurement.
Still, your chart projector and the mirror are mounted to the walls, so how could the distance ever change?
It’s not rare if someone moves your chair! If your exam chair is moved even just a few inches, that distance will be exaggerated by the optical “folding” effect of the mirror. Now your visual acuity measurements will be overcorrected if too near or undercorrected if too far.
We have some complex mathematical formulas to verify if your projector is properly calibrated—but there’s also a quick, shorthand way: Take a ruler and measure the 20/200 E optotype on the screen behind the patient’s chair. It should measure 88.7mm high when testing for a 20-foot distance. You can measure the test distance in a folded operatory by measuring the distance from the patient’s chair to the mirror in front of the patient plus the distance from the top mirror to the screen behind the patient. A simple ratio can help you to confirm if the projected letter size you measure is correct for your test distance. For example, if your lane measures 18 feet instead of 20 feet, the letter size should be 79.83mm instead of 88.7mm.
If it doesn’t measure up, try adjusting the tubes on the chart projector by loosening the small set screws to change the letter size until it measures the correct calculated size.
Disinfection and Sterilization
First, the good news: Most optometric procedures have a very low risk for the transmission of disease.
Now, the bad news: If you’re mainly using alcohol wipes, you may not be properly disinfecting your equipment, and you could be putting your patients, your staff and yourself at risk for spreading infection.
Ideally, we should be following the Centers for Disease Control and Prevention’s “Guideline for Disinfection and Sterilization in Healthcare Facilities,” which categorizes instruments and patient care items into three classes according to the degree of risk for infection involved in their use: critical, semicritical and noncritical.1
• Critical. Items that carry a critical (high) risk for infection if contaminated with any microorganism include surgical instruments and those that come into contact with blood (for example, those used for lid procedures). So, most of us don’t often use items with this risk of infection.
These items require sterilization in order to eliminate all microorganisms and their spores. The most efficient and cost-effective sterilization method for optometric offices is a tabletop steam autoclave unit. Steam sterilization requires at least 15 minutes at 121°C (250°F).
Wrap instruments in peel pouches beforehand to maintain sterility after autoclaving.
• Semi-critical. Items that carry a semi-critical risk for infection include those that come in contact with non-intact skin or mucous membranes, such as the conjunctiva or tears. Tonometer tips, fundus contact lenses, foreign body instruments and trial contact lenses all fall into this category.
These items require a high-level disinfection, which provides complete elimination of all microorganisms, except for a small number of bacterial spores. For our purposes, high-level disinfection involves cleaning and then immersion in a liquid sterilant. (See “High-Level Disinfection in Three Effective Ways”). This generally eliminates enough pathogens to prevent transmission of infection.
• Non-critical. These are items that come in contact with intact skin but not mucous membranes (e.g., occluders, forehead and chin rests of the slit lamp). These items require a low-level disinfection, which can be accomplished with an alcohol prep pad. Low-level disinfection is successful in killing most vegetative bacteria, some fungi and some (but not all) viruses.
Indeed, there are several documented cases of EKC outbreaks that have been linked to the use of alcohol wipes to disinfect tonometer tips.2,3 While adenovirus may be the most frequently-reported infection transmitted by ophthalmic equipment, many other diseases could very well be spread in the same way, which is why we need to make standard precautions part of our daily routine.
The other major problem with alcohol is that it causes damage to the tip of the tonometer probes. Although probe damage occurs over time regardless, it can be exacerbated by certain factors, namely alcohol. This is called “tension rip damage” where the very tip itself develops small cracks.
These cracks cause a couple of problems—they can harbor epithelial cells and virulent microbes that are difficult to eradicate during disinfection and represent potential risks for cross-infection. Also, the cracks can even cause damage to the corneal epithelium, making it more susceptible to infection.
While no scientific evidence or documented cases exist of HIV, hepatitis B or C transmission resulting from optometric care, ask yourself this: Would you do anything differently in terms of equipment disinfection if you know your patient has HIV? Your answer should be no, because your disinfecting procedures should already take HIV, or any pathogen, into account. n
Dr. Pate is an associate professor of optometry at University of Alabama at Birmingham School of Optometry, and lectures frequently on diagnostic testing and equipment.
1. Rutala WA, Weber DJ; Healthcare Infection Control Practices Advisory Committee. Guideline for Disinfection and Sterilization in Healthcare Facilities 2008. Atlanta, GA: Centers for Disease Control and Prevention; 2008:10-11.
2. Koo D, Bouvier B, Wesley M, et al. Epidemic keratoconjunctivitis in a university medical center ophthalmology clinic; need for re-evaluation of the design and disinfection of instruments. Infect Control Hosp Epidemiol. 1989;10:547-52.
3. Jernigan JA, Lowry BS, Hayden FG, et al. Adenovirus type 8 epidemic keratoconjunctivitis in an eye clinic: risk factors and control. J Infect Dis. 1993;167:1307-13.