Low vision rehabilitation (LVR) is a specialization that offers great growth opportunity for your practice. The new definition of low vision for the primary care optometrist is anyone with irreversible vision loss who has an unfulfilled visual goal.
This broad scope of potential low vision patients includes the dry age-related macular degeneration (AMD) patient with 20/40 BVA who is having difficulty reading the newspaper. Or how about the diabetic patient with non-proliferative diabetic retinopathy who has difficulty seeing his or her medication labels? Or what about a teenager with albinism who is interested in driving? Or what about the patient you comanage with an ophthalmology subspecialist? Retina specialists, in particular, are increasingly aware of the benefits of LVR and are more than happy to send patients your way.
In other words, more than likely, you already provide low vision rehabilitation without even realizing it. The bottom line is that you need to throw out the antiquated notion that LVR is only for those patients with legal blindness or worse, and then you’ll start to realize just how many folks in your practice may benefit from LVR, and in turn, how adding LVR can boost your practice’s income.
Assembling Your LVR Tool Kit
To get started in LVR, you may need to invest some time and money. The good news is that, most likely, you already have most of the equipment already, such as a projector chart, trial frame, trial lens kit and diagnostic equipment. And, in many instances, you’ve already conducted your comprehensive eye examination and made your diagnosis, treatment and management decisions for potential LVR patients.
Then, once you’ve determined which patients have unfulfilled visual goals, you can stack these patients one day a month, or every other week, for LVR.
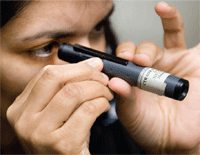
Handheld telescopes are ideal for long-range visual tasking, such as reading street signs and watching television.
Here’s the additional equipment you’ll need:
• Low vision charts. The first step is to have a variety of charts that are needed to address the visually impaired patient. If visual acuity is worse than 20/100, it’s helpful to have hand-held distance charts such as the Feinbloom number chart (Designs for Vision). This chart is ideal because you can vary the test distance, and it has a large range of target in the low vision range. Alternatives include ETDRS, Bailey-Lovie or electronic projector charts with a log scale and greater range.
To measure near visual acuity, you should have both a single letter chart and a continuous text/paragraph chart. The single letter data may indicate optimal acuity, and continuous text charts reflect actual reading performance.
Another simple but critical tool is a tape measure to determine the distance from the spectacle plane to the patient’s reading material. It’s essential to encourage the patient to hold the chart where they are able to see it best, as opposed to instructing them to hold it at 40cm in the primary eye care exam. The size print in M notation and the working distance provide a solid foundation for estimating the magnification needed to accomplish the patient’s goals. Don’t use reduced Snellen if a patient is not holding charts at 40cm! Calibration only applies with a 40cm testing distance, but many low vision patients may hold it closer to get some enlargement effect.
• Low vision devices. The second step is stocking your diagnostic toolbox. It helps to have a range of devices that represent different options for accomplishing the patient’s vision goals. It is also good to have devices that range in cost, which offer financial options for the patient. It is very important to include some assistive technology in your tool kit because it provides a broader exposure to treatment solutions in LVR. The simple categories include near devices for reading, distance devices, video magnifier systems and filters for glare and contrast.
After a trial frame refraction, you can assess the initial response to magnification by using high plus trial lenses. This enables you to gauge your patient’s response to decreased working distance while reading smaller print. In the early stages, a simple single-vision pair of reading glasses or higher add computer bifocals may be sufficient to meet the patient’s needs.
Suggested Distance Devices
• 2.8x Selsi telescope
• 4x12 Walters handheld telescope
• Max TV
• 2.2x bioptic telescopic spectacle
Assuming that one goal of LVR is reading, it’s important to recognize that low vision patients may not understand there are different tools for different tasks. In the same way that we can’t use a hammer to saw, there may not be one solution for everything your patient wants to do. Separating reading goals into short-term spotting and longer-term reading is beneficial to the process.
For primary care patients with relatively good acuity, some of the most effective diagnostic devices for evaluating reading include a 4x dome magnifier, such as a Magnabrite (Visual Aid Lab), a 3.5x/10D LED illuminated hand-held magnifier, a 5x halogen illuminated stand magnifier with transformer handle and a 6x stand magnifier. The range of devices provides the patient with a better understanding of the pros and cons of each solution. These devices also represent a range of costs that may impact patient decision-making.
Within each category of device there are a range of magnifications that you can expand into as well. If you incorporate illumination into the evaluation, this will provide information related to contrast as well. A general rule to consider: Don’t prescribe devices that are readily available over the counter because it’s almost impossible to compete in price for a prescription quality magnifier.
For distance tasks, such as watching television, spotting signs at a distance or seeing faces, your tool kit might include a 2.8x Selsi telescope, 4x12 Walters hand-held telescope, Max TV and 2.2x bioptic telescopic spectacle ([BTS] Designs for Vision), or a 3x Ocutech Mini BTS. Low power telescopes have a relatively large field of view and are ideal for introducing the concept of magnification at a distance. Wearable telescopes may be along the line of sight, such as the 2x MaxTV, or in a bioptic design. The bioptic telescopic spectacle in particular can improve a patient from 20/40 to 20/20. These patients might not otherwise be able to see that level of detail. Although they require some training after the fit, bioptic telescopic spectacles should be part of your primary care tool kit.
Suggested Near Devices
•
Dome magnifier
• 3.5x LED illuminated handheld magnifier
• 5x halogen illuminated stand magnifier with transformer handle
• 6x stand magnifier
Assistive technology has become more accessible and commonplace for patients. Video magnifiers in particular are very effective for reading tasks and may consist of desktop reading machines, hybrid devices for near and distance tasks that can integrate with computers, and hand-held units that are comparable in cost to some optical stand magnifiers. The primary advantages include the ability to enlarge text and enhance contrast. Specifically, the desktop unit may be used as a diagnostic device to help determine the patient’s optimal level of magnification and acuity reserve. Even for patients with relatively good VA, it’s important to introduce the range of treatment options early, so that as the disease progresses, they are aware of future solutions down the road.
The goal in assembling your tool kit is to have a range of devices that provide suitable magnification as well as provide the patient with some insight as to how these devices might fullfill their needs. In addition, it’s helpful to have products from a wide price range availble to provide an idea of what solutions are available at the various price points.
Last but not least, it’s important to recognize that with greater complexity comes increased reimbursement. In the same way a specialty GP lens for keratoconus is expected to be more expensive than a soft hydrogel lens, a bioptic telescopic spectacle is more expensive than a traditional pair of glasses or telescope. The point is that if you limit yourself to the most basic tools, you will do a disservice to your patients and limit the financial benefits from providing LVR care.
Patient Flow and Billing
Low vision patients have ocular diseases that you have already diagnosed, managed and treated. At this stage, it’s appropriate to explain that LVR is a process to help use their remaining functional vision more effectively. There are various assistive devices, techniques and training that may help your patient to accomplish their goals.
However, there is no quick fix. You need to explain that there are no “magic glasses” to make it like it used to be. If they are willing to explore the potential to maximize their remaining vision towards accomplishing their goals, they are ready to be scheduled for your low vision exam.
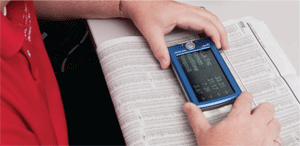
Handheld video magnifiers can be extremely useful for reading small text, such as stock reports or label information.
At this follow-up visit, we often bill medical insurance for an evaluation and management (E/M) visit based on counseling and education time. The ICD-9 codes for the disease along with the applicable visual impairment code should be included.
Many providers include a non-covered refraction/magnification/assessment fee. This is the out-of-pocket cost to the patient for the evaluation to determine the appropriate prescriptive device. As mentioned earlier, this includes evaluating their response to a range of options and helping to determine the appropriate prescriptive device. A 30 to 45 minute appointment slot is generally sufficient time to accomplish the evaluation and initial recommendation.
Additional visits may be necessary for training with the device(s) and dispensing. Your staff should be patient and compassionate when training the patient on how to use the particular device consistently and effectively. In the same way that we train staff to do contact lens insertion/removal training and cleaning protocols, staff must implement protocols to conduct training to maximize successful outcomes. An alternative is to consider working with an occupational therapist with some training in LVR who may also incorporate your prescriptive devices into home adaptations and activities of daily living. Oftentimes, medical insurance and Medicare may cover these services.
Whether you start with one day a month for LVR or more, you may find that as your confidence grows, you’ll start expanding your pool of low vision patients to include those with worse acuity. Consequently, you’ll need to grow your toolbox to meet these additional demands as well as come up with some creative solutions for other unique objectives. LVR can be tremendously rewarding and fulfilling, but you can only find out if you take the first step and try. (
The AOA Vision Rehabilitation section has a number of resources that may help nudge you in that direction.)
Dr. Woo is a clinical associate professor at the University of Houston College of Optometry, and founding director of UHCO’s Center for Sight Enhancement, a multi-disciplinary low vision rehabilitation clinic. He teaches in the clinic and is course master for the didactic programs in low vision rehabilitation. He is also UHCO’s director of the residency program in low vision rehabilitation.